New Let’s Celebrate Collection: Mother’s Day with Mauve and Gold
- gracethrufaithgoods
- 03/29/2024
- DIY Tutorials
Hi mates! Emily Midgett listed here with you these days on the Spellbinders blog site, and I’m thrilled to be sharing some inspiration applying the utterly luscious new selection from Yana Smakula identified as Let’s Rejoice.
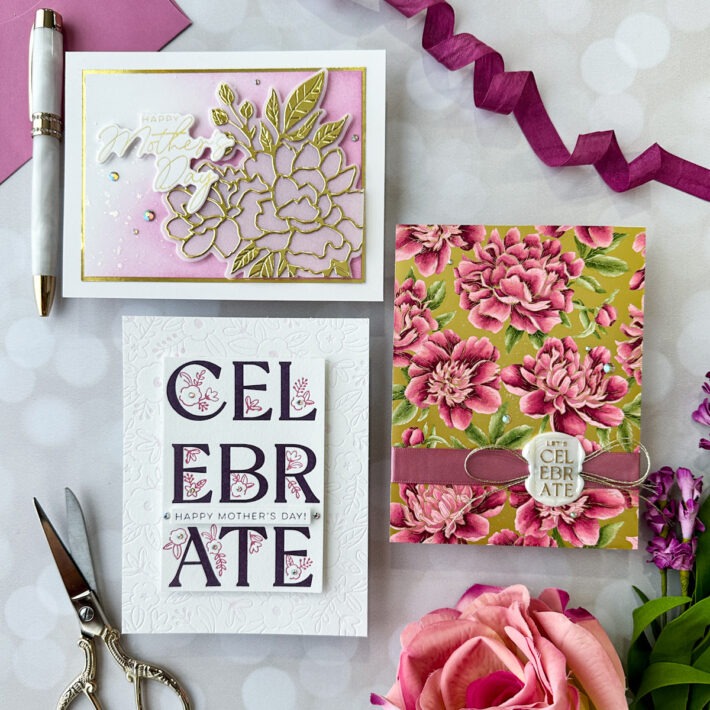
Yana’s signature model with elegant florals and wonderful calligraphic sentiments is laced all over this collection, and it was a real pleasure to enjoy with! The shining star of the collection, for me at least, is the divine Peony Far better Press Plate. The Better Press Plates function fantastically with both equally the Far better Push method and the Glimmer Warm Foil Process, and the two methods function extremely properly with this exquisitely in-depth push plate. When I am making a card established, I like to to start with pick my color mixture and let that to lead me creatively, and for today’s venture suite, I made a decision to use mauve and gold as the leaping-off level for my trio of Mother’s Working day projects. Mauve and gold are a excellent coloration palette for a Mother’s Day card, in my belief!
Each time I am developing a card set, I like to initially decide on my colour blend and allow for that to direct me creatively, and for today’s job suite, I made the decision to use mauve and gold as the leaping-off level for my trio of Mother’s Working day initiatives. Mauve and gold are a fantastic coloration palette for a Mother’s Working day card, in my impression! I pulled out the Mulberry and Garnet inks from the Improved Push Ink line, Outdated Rose Satin Ribbon, Gold Metallic Wire, and some Mirror Gold cardstock to established my colour palette firmly in my mind’s eye.
For my first venture, I authorized the aspects on the Peony Better Press plate to pretty literally glow by pairing it with some Matte Gold Glimmer Foil.
- Incredibly hot foil the Peony Superior Push Plate onto some liquor marker-pleasant white cardstock using your option of incredibly hot foil.
- Use liquor markers these types of as OLO Markers to increase shade and depth to the floral illustrations or photos.
- To develop the wax seal, 1st tie a vast bow with two strands of gold cord, putting the completed bow on your silicone mat.
- Soften white pearl wax beads, pouring them in an rectangular on your silicone mat right more than the centre of the gold bow.
- Put the Let us Rejoice Wax Seal around the melted wax and let it to great.
- Frivolously brush a gold paint marker in excess of the lifted letters on the cooled wax seal to make them stand out and coordinate with the gold foiled background.
- Wrap a duration of ribbon around your coloured card front, adhering it on the again with strong double-sided adhesive.
- Use a Wax Seal Adhesive to add the done wax seal and gold wire straight more than the ribbon, offsetting it to a person aspect.
- End the card with some glowing Aura AB gems!
For my 2nd card, I established a uncomplicated and sophisticated card with tons of shine and sparkle employing the spectacularly in-depth Peony Celebration die. This die is quite intricate, and I wanted to allow those information be the star of the demonstrate with Gold Mirror cardstock, which also cuts like an complete aspiration.
- Begin by die-reducing the detail layer of the Peony Celebration die with Spellbinders Mirror Gold cardstock.
- Back again the comprehensive layer with the shadow layer cut from heavyweight vellum.
- To incorporate shade powering the easy die lower, I blended some mauve ink on the corner of a panel of white cardstock utilizing a blending brush.
- Splatter some sparkling glitter watercolor with a paintbrush on the blended area.
- Use foam squares to pop up the peony die reduce in the corner of the blended panel, trimming off any excessive from the edges.
- Mat the blended panel with a marginally more substantial piece of Gold Mirror cardstock.
- Incredibly hot foil the Mother’s Day greeting from Let us Celebrate Sentiments utilizing Matte Gold incredibly hot foil, then die reduce with the coordinating die.
- Increase the die-slash greeting to the blended track record utilizing extra foam squares, tucking it following to the peony die-lower.
- Include a few Aura AB gems for even extra sparkle.
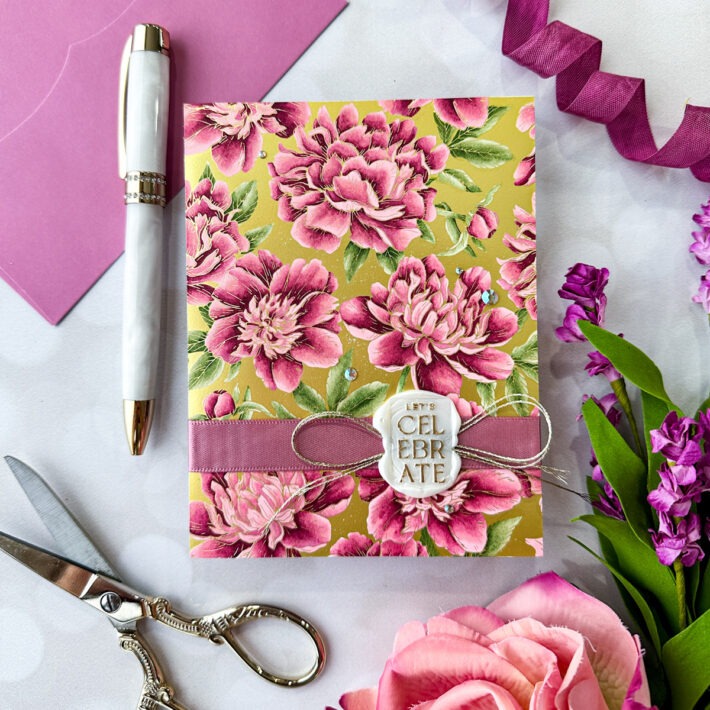
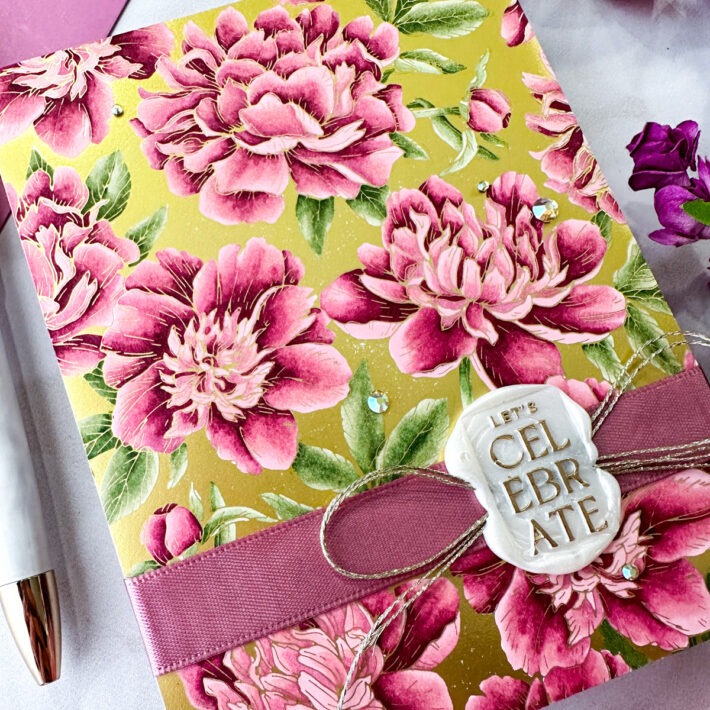
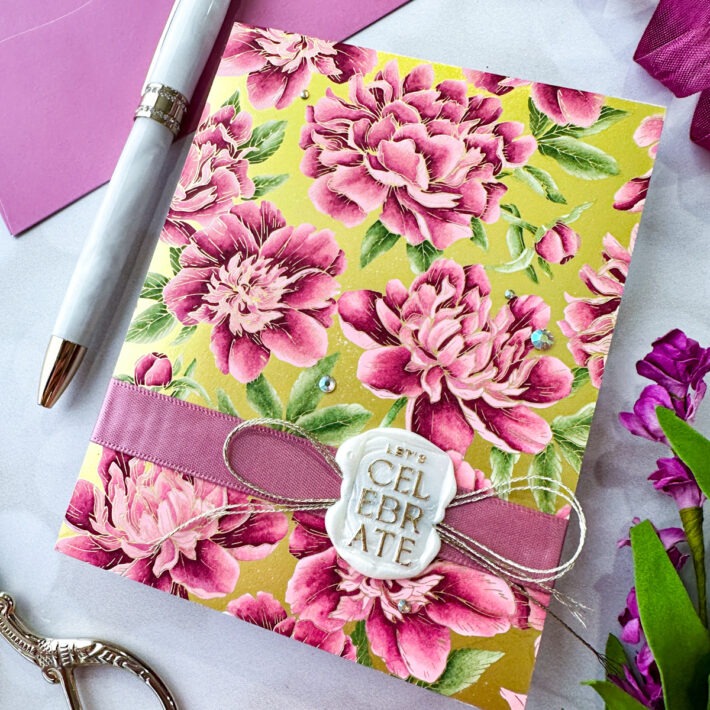
For my closing task, I resolved to use the Floral Celebration Superior Press Plate and Rejoice Bouquets Registration Press Plate sets jointly. The delicate sprigs of flowers on the Celebrate Bouquets Registration Press Plate are a perfect match for the floral track record of the Floral Celebration Push Plate!
- Start by inking up the Floral Celebration Press Plate with Garnet Improved Push Ink, then run it as a result of your equipment with a panel of letterpress paper.
- Without reinking or relocating your Push Plate, position yet another panel of Far better Press paper on your Platen and operate the paper by way of once again, producing a pretty subtly coloured letterpress impact on your clear paper and adding beautiful texture.
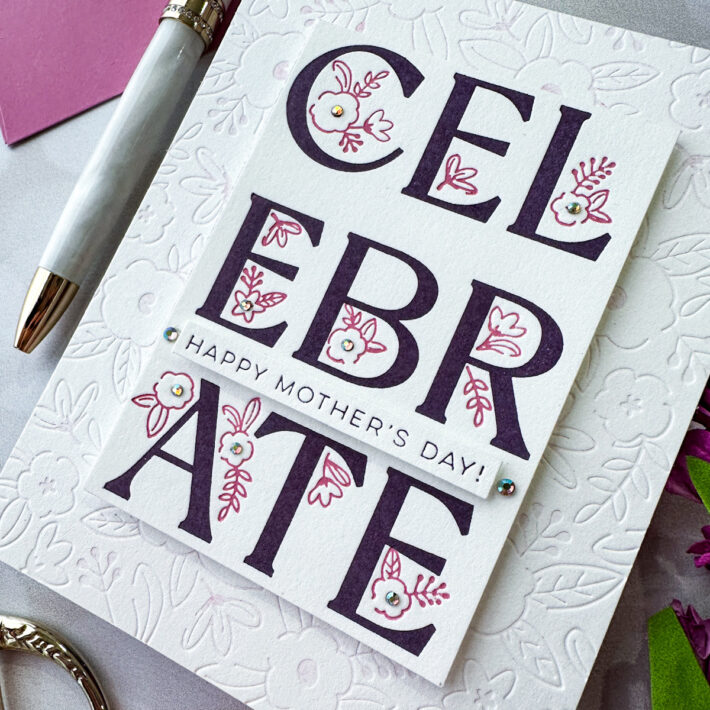
- For the greeting, use Mulberry Improved Push Ink to impress the large “CELEBRATE” and “Happy Mother’s Day” greetings from the Celebrate Bouquets Registration Plate established onto Porcelain letterpress paper.
- Applying the printed acetate tutorial included with the Celebrate Flowers Registration Plate established, line up the floral sprigs and ink it up with Garnet Improved Press ink.
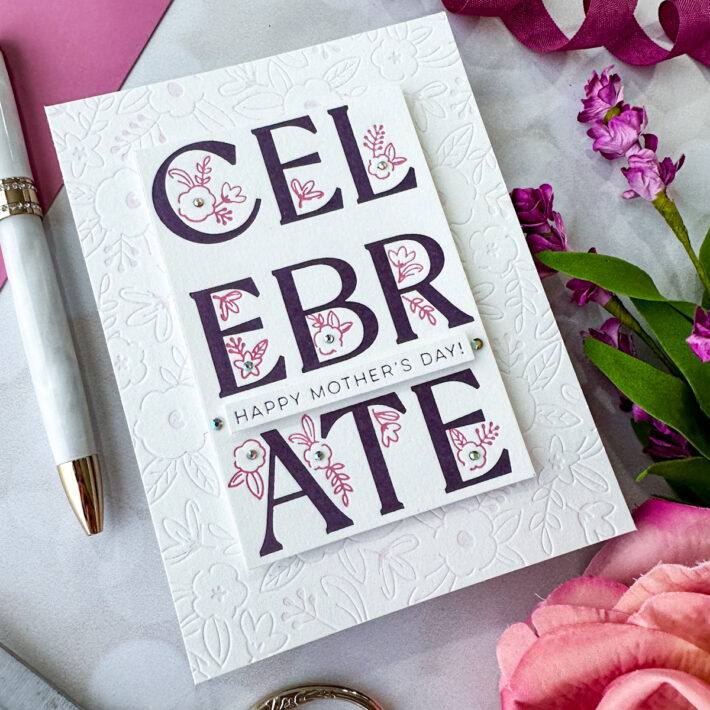
- Making use of a trimmer, lower the letterpress sentiments down.
- Adhere the small sentiment strip on the greater Rejoice piece applying foam squares.
- Pop each sentiment items up in the heart of the letter pressed panel making use of foam squares.
- Embellish the card with Aura AB gems in the heart of the flowers on the sentiment panels.
Nicely, which is all for my jobs today! Getting equipped to use the Superior Push Plates with the two the Glimmer device and the Greater Push device opens up so many distinctive prospects for your crafting time. The opportunities are confined only to your innovative imagination! If you’d like to see far more of my do the job, you can cease by my weblog about at EmilyMidgett.com or check out out my Instagram website page @eamidgett. Thank you so much to Spellbinders for acquiring me as their visitor and allowing me the option to get the job done with these stunning new products! Thanks so significantly for examining, and have a great day!
Spellbinders Provides:

Other Materials
Harmony and 9th Briar Rose ink, Hammermill white cardstock